This notebook provides an introduction to Jupyter Notebooks, including an overview of the notebook interface and basic programing concepts. This notebook was created by Becky Vandewalle based on prior work by Dandong Yin.
Introduction
The Jupyter Notebook interface makes interactive computing easily accessible. It contains a web interface for dynamic programming and visualization and stores all the content in a file for reproducibility.
General documentation: https://jupyter.org/documentation
Introduction to the Jupyter Notebook: https://jupyter-notebook.readthedocs.io/en/stable/notebook.html
Jupyter Notebook Basics: https://jupyter-notebook.readthedocs.io/en/stable/examples/Notebook/Notebook%20Basics.html
This notebook is an extension of the Jupyter Notebook QuickStart Notebook. While there will be some overlap, this Notebook includes much more detail on Notebook features.
# import required libraries

import os
from IPython.display import Image

#execfile(os.path.join('/share/pyintro_resources/','highlight_feats.py'))
# Python 2 -> Python 3

filename = 'pyintro_resources/highlight_feats.py'
exec(compile(open(filename, "rb").read(), filename, 'exec'))
The Jupyter Ecosystem
The Jupyter project has a variety of features that support and extend Jupyter Notebook functionality. Here we will focus on the Jupyter Notebook, which makes use of IPython for interactive scripting. Other programming languages can be used in a Jupyter Notebook through kernels (IPython is a kernel maintained by Project Jupyter). Finally, Widgets can be used to create a graphic interface for interacting with scripts and displaying results. This is just a small part of the Jupyter Ecosystem - there is more to explore in future notebooks!
Explore the Interface
Two key areas for working with Jupyter Notebooks are the Notebook Dashboard, where you work with files, folder, and notebooks, and the Notebook Interface itself. Check out some important features of the user interface using the widget below.
# Select a feature to learn more

hl_feats()

Command Mode and Edit Mode
There are two modes that are used when working with a Jupyter Notebook, Command Mode and Edit Mode:
Command Mode:
- Cell has a blue border
- You can edit features of the notebook as a whole, but not text within the selected cell
Below is a cell in Command Mode:
Image(os.path.join('pyintro_resources/img', 'command_mode.png'))

Edit Mode:
- Cell has a green border
- You can enter text at the cursor position
Below is a cell in Edit Mode. Note the cursor after the end of world'.
Image(os.path.join('pyintro_resources/img/edit_mode.png'))

Switching between Command and Edit modes
Clicking in a cell currently displayed with a grey box (a code cell) will take you to Edit Mode. Double clicking on a cell without a grey box (more on Markdown cells later) will take you to Command Mode and clicking once more will take you to Edit Mode. Pressing Esc or clicking outside the cell while in Edit Mode will switch to Command Mode.
Common Keyboard Shortcuts
A variety of keyboard shortcuts make editing a Notebook more efficient. Check the Command Palette (in the tool bar) if you forget one. Also, keep in mind that these shortcuts are mode sensitive - they will often work differently in Command Mode vs Edit Mode. Try some of these out in the next few cells!
The Command Palette is highlighted below:
Image(os.path.join('pyintro_resources/img', 'tool_bar_shortcut.png'))

Save:
You can save the notebook by hitting s in Command Mode, by clicking the Save button on the toolbar, or by File -> Save and Checkpoint.
Run Cell:
You can run a cell by hitting Enter (or Shift+Return) in Command or Edit Mode. If the cell produces output, that will typically be displayed directly below the cell.
# run me!

print('You ran this cell!')
Inserting a Cell Above the Current Cell:
You can insert a cell above the currently selected cell by hitting a in Command Mode.
# try to insert a new cell above this one
Inserting a Cell Below the Current Cell:
You can insert a cell above the currently selected cell by hitting b in Command Mode.
# try to insert a new cell below this one
Copy and Paste a Cell:
You can copy a cell by hitting c in Command Mode and paste below the current cell by hitting v or paste above the current cell by hitting Shift+v in Command Mode.
# Copy this cell - place the new cell --Above-- this one
# Copy this cell - place the new cell --Below-- this one
Delete a Cell:
You can delete a cell by hitting d twice in Command Mode.
## Delete me!
## Delete me too!
Change a Cell Mode from Code to Markdown:
You can change a cell from code to markdown by hitting m in Command Mode. The cell below is a code cell - practice changing this cell to a markdown cell.
#### Change me to Markdown!
Change a Cell Mode from Markdown to Code:
You can change a cell from code to markdown by hitting y in Command Mode (don't forget to double click on a Markdown Cell to edit it). The cell below is a markdown cell - practice changing this cell to a code cell (and run it).
Change me to Code!
print ('hello')
Using Tab:
The Tab key is good for giving coding suggestions. If you have a partially complete keyword or object name, Tab will suggest ways to complete the word. If you have a function, pressing Tab within the parentheses will show arguments.
# place the cursor after the 'r' and press tab to see possible words starting with 'pr'
# !!note, running this cell will raise an error because 'pr' is not complete!

pr

# place the cursor in the parentheses and press tab to see arguments

print()
Markdown
Markdown is a popular markup language for simple text formatting. This language is used in Markdown cells.
Headings:
Headings are useful to organize text. Place one or multiple # signs in front of text at the beginning of a line to create a heading. Double click the next (markdown) cell to see how these headings are created.
Lists:
Lists are very useful for organizing information. Markdown supports both numbered and bulleted lists. Double click the next two (markdown) cells to see how these lists are created. Note that the actual numbers entered in the numbered list are changed to be in order! Also, although you can continue to indent in a bulleted list, there are only so many symbols used.
Numbered List:
- Thing one
- Thing two
- Thing three
- Thing two again
- Thing three again
Bulleted List:
- Thing one
- Thing one a
- Thing two
- Thing two a
- Thing two double a
- Too many things
- Thing two double a
- Thing two a
- Thing three
Links:
Links help for referencing information. Create a link using square brackets followed by parentheses. You can link to a website, another file or notebook in your Notebook Dashboard, or even to another section of the current notebook. Double click the next (markdown) cell to see how these links are created.
link to the Cybergis Center website
link to an image (note path is relative to this notebook)
link to a Markdown cell by header (type heading after # for internal link)
link to a Markdown cell by section id (link to HTML anchor in cell above Markdown heading)
Equations:
Equations are written using LaTeX. Surrounding the equation with one dollar sign ($) on each end makes it inline. With two dollar signs, the equation is displayed on its own line. Double click the next (markdown) cell to see how these equations are created. Some symbols are found on the keyboard, like +, ^, and *. Others are formed using a slash followed by a text tag, like \times.
See a list of LaTeX math symbols here
Here is an inline equation $\int^a_b \frac{1}{3}x^3$ in the line. $$\int^a_b \frac{1}{3}x^3$$ The second equation is not inline.
HTML
HTML tags can be used to adjust text formatting. Double click the next (markdown) cell to see some commonly used tags.
bold text, italic text
(line breaks above and below)
text color,
text size,
text font
Using command-line tools
In a Jupyter Notebook, a cell starts with "!" is recognized as a Bash command. Below are some common commands:
ls: list files and directoriescd: change current working directorypwd: print current working directoryhead: peek the first (10) lines of a filetail: peek the last (10) lines of a filewc: count a file (lines, words, etc.)file: check the type of a file
Try out a few commands below!
!ls
!pwd
Linux file system basics
The Linux file system structure is set up like a tree. The root, /, is the top level container for all the other files and folders (called directories). Folders can be nested inside other folders. To show that one folder is within another, a slash separates the two folders, like: parent_folder/child_folder. This also is the case for files in a folder: myfolder/text.txt shows that the file text.txt is within myfolder.
When you printed the current directory above using the pwd command, you should see a path starting with several folders (home, jovyan, and work).
Permission control
Any file or directory in the Linux file system has a set of permissions.
There are 3 kinds of permissions (read, write, and execute) and 3 kinds of users (owner, group, and others). When you check file permissions, r is short for read, w for write and x for execute. Each set of three slots indicates whether these permissions are for the file Owner, Group, or Others.
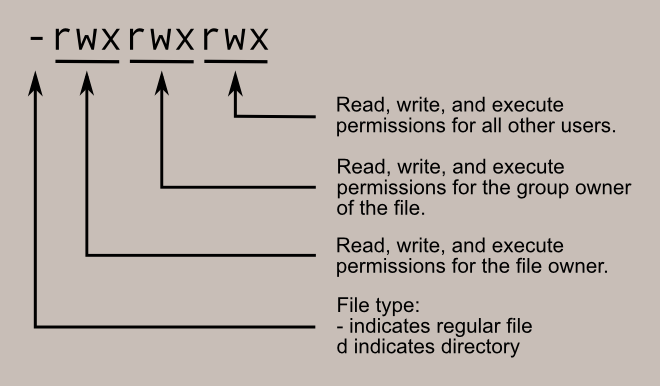
Check permissions: ls -l
Change permissions (for files you own): chmod
Change ownership (for files you own): chown
Change group (for files you own): chgrp
For more info: http://linuxcommand.org/lc3_lts0090.php
!ls -l test_file.txt
Next Steps
Now that you are more familiar with the Jupyter Notebook environment, check out the Intro to Python Programming Notebook for an overview of programming with Python!